

Tuesday, December 21, 2010
Whip Up a Quick Bag
Sunday, December 19, 2010
Winner!

Who doesn't like to win things? I did and I did a little happy dance when I found out. I went to Twin Fibers blog to enter a giveaway for pot holders. I have to say I had a serious need! I have been buying totally useless potholders for the past year. They just dont work. I tried to make myself a pair of potholders and I have to say it was pretty much a waste of time because I totally screwed up the binding, Now that I have a little more experience I may try again. But then enter the giveaway... I won. Yeah baby, I won.
And I have to say now that I have received them I don't want to use them because they are just to dang pretty!
Thank you ladies, I love them!

Sunday, December 12, 2010
Santa's Elf

I had so much fun making this.
Friday, December 10, 2010
No Sew Quilted Ornaments

This is a no sew project.
You take a 1 1/2 inch to 2 inch piece of fabric, depending on the size of your styrofoam ball.
Fold the square in half and then fold the corners down diagonally. Place a flat pin in the upper corner and fold down the sides again to cover the pin head. Meet the four corners at the top. Do next row, placing the squares about half way down the squares that are already place on the ball. Work until you reach the center. Turn ball around and repeat the process. Add ribbon and decorative pins.
You could also do some in other colors and place them in a glass bowl for a decorative look.

Friday, December 3, 2010
Reusable Cloth Sandwich Bags


Lay a 17 x 5 (or whatever dimensions you like) piece of fabric out.
Zig zag or serge the edges. On one short side turn down a 1/4 inch and then turn down a 1/4 inch again.
Lay fabric right side up.
Turn aabout 2 1/2inches of the short end down. THis will become your foldover for the top of the bag.
Now bring the bottom up and cover the 2 1/2 inches you just turned down.
Sew along the two sides.
Turn right side out.


Saturday, November 27, 2010
Christmas Wall Hanging

Sunday, November 21, 2010
Pajama Bottoms
I was so thrilled the first time I did this and it came out. I had to share it with you just because I have so much fun making pajama bottoms. Now for the top... I will keep you posted.
 First I fold the pants and lay them out on the material. Then I roughly cut around them leaving some space for seam allowance.
 My kids need to know where the back is so I mark it to make it a bit easier. Isn't that cupcake cute?
 I always make a casing for the elastic. I can reuse it if I need to. I always so an x for added security.
 All done. A snap to make really.


Wednesday, November 10, 2010
Felt Flowers

I picked up one of those craft sheets at Joannes- You know the kind that invariably make you spend money so that you have the materials to make the thing. I actually try not to do that anymore. This one I actually had all the stuff already. It was a nice project for my four year old. Its a challenge to find nice crafts for four year old hands.

We used wire to thread through the felt and buttons and then wrapped it down with pipe cleaners. On a few I made leaves. Fun!
Sunday, November 7, 2010
Pieced- now its time for a quilt sandwich.
 |
| All pieced. Yeah! |
 |
| One of my faves- forgot what it is called. |
 |
| I love the boat and storm at sea as well. |
 |
| I like this variation of the Drunkards Path. |
 |
| Love the barn dance too. |
 |
| Dahlias rock. Could totally see more of these in my future. |
Friday, October 29, 2010
Nearly there

The next picture I post will be the full 30 blocks and all of it pieced. And maybe even the batting and backing put in place.
Some of the patches I did were not from my class. Since I did 30 squares, I ran out of options so I found a few I liked on the internet and in books. A few that I found- Barn Dance (bottom right) and Beginners Joy (not pictured). My oldest daughter said, how come you did not start with Beginners Joy. Good question goose. I really like how that particular patch came out.
I know it seems kind of busy. The class taught me so much. A major learning curve for me.
Tuesday, October 26, 2010
A few more patches from my Sampler Quilt
 |
| The Garden Block |
 |
| Sisters Choice |
 |
| Eight Pointed Star |
 |
| Flying Geese |
Friday, October 8, 2010
Barrettes
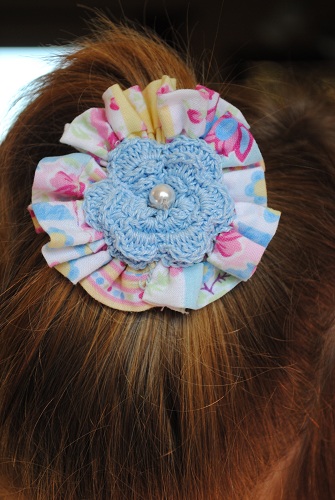
This is a hair barrette I recently made for my daughters. It was kind of a mother/daughter project. My mother is an expert crocheter. I have a chest full of table covers and bread spread and doilies that she made. I had commissioned her a while back to make me a ton of these flowers in various colors. I want to use them for different projects. This was one of the projects.
Here is what I did:
The base is a two inch strip of fabric, folded over and pressed. Run a gathering stitch across both raw edges, down the lengths of the fabric. Stitch to close in flower and keep it from unraveling.
Next sew a pearl bead into the center of the crocheted flower, then attached it onto the fabric base.
Finally secure a hair barrette base to the back of the flower.
Simple I know but if I don't write it down I will forget.
Tuesday, October 5, 2010
Sampler Quilt Blocks
Here are a few of the blocks for my sampler quilt.
 Jacob's Ladder- I like this one- it's quick and easy. I like how the design plays out.
 I think this one is called Clay's Choice. It's a type of pinwheel.
 This I think is my favorite so far. I am a sucker for anything nautical or beachy. I can see a whole quilt of this in red, white and blue's- very cool.
 This is the basic pinwheel design. As a large quilt full of pinwheels in wild colors- I think it would be totally breath taking.
And if you are the least bit interested in quilting I highly recommend taking a class. It has been so fun and interesting and VERY inspirational. I made my first quilt about twenty years ago- Sorry to say that it is in the landfill because I totally messed it up. The second quilt I made is in the other room about to be finished- machine done. This one will be hand quilted which I am looking forward to. A huge learning curve for me. I wish I had done it twenty years ago.


And if you are the least bit interested in quilting I highly recommend taking a class. It has been so fun and interesting and VERY inspirational. I made my first quilt about twenty years ago- Sorry to say that it is in the landfill because I totally messed it up. The second quilt I made is in the other room about to be finished- machine done. This one will be hand quilted which I am looking forward to. A huge learning curve for me. I wish I had done it twenty years ago.
Saturday, September 25, 2010
A little outift.

I used a pair of pants in my daughters closet as a pattern to make the pants. Then I used the bodice of one of my patterns to make the top of the shirt. Then I tweaked everything else. I was so excited to see it turn out- turn out well. I have been such a sub par sewer all my life. Things just never really turn out for me. SO this was truly a triumph. Wahooo. I am glad I kept on trudging along. I guess making all those curtains at our previous house gave me the experience I needed.

Friday, September 17, 2010
Block 1 for class

We are doing a sampler quilt, aka legacy quilt. I wanted some neutral colors that were autumn like and relaxing. So funny as soon as I picked them out and brought them home I didn't like them. What a bummer. But of course after spending all that money I am moving forward with the quilt. Honestly, it is growing on me a bit. I found a tiny piece of scrap fabric that will jazz it up. Now I have to see if I can find it out in the stores or something similar.
The first square for the quilt is above. I learned piecing which I have never done. But so many things by the way of quilting I have never done. We have five squares to complete by next class. Whew!
Sunday, September 12, 2010
Backpack for Back to School

I saw this backpack here. I knew I had to make it. My daughter who just entered PreK just loved it. She is all into polka dots. I bought this canvas and she loved it. The dog is her touch to the backpack. It sewed up so fast. The thing that took the longest was the flowers and embroidering her name on it. You can check out the tutorial here.

Here is the back view:

Tuesday, August 31, 2010
Gearing Up for Back to School, Halloween, and Christmas

I have been sewing so much. So much that I have not posted because I am either running with the kids somewhere, canning, baking, cleaning or sewing. D-o-m-e-s-t-i-c Diva that I am (cough).
This project was a quickie and I know at Christmas time it will make some little girls I know happy.

Monday, June 7, 2010
Grab Bag Present

Love this purse. I think I want one in every color. Before I show you what I did, I want to pass along two links. One to allepoplequilt.com for the pattern. The other one is for Martha Stewart for an instructional video.

Sew all around the body of the bag, an inch or so below where it would scoop if you drew a line from there to the edges. Do not sew the arms/straps at all. Then sew the "neck"/the inside of the scoop. Then you turn it out and stuff the one bag into the other so that right sides are facing out.


Friday, May 28, 2010
Recovering a Chair

Here's how to recover a chair step by step. This is the quick and easy way, covering the old cushiona nd material and all. If you really want to do this perfectly, I highly recommend stripping the old material off and the old cushion off before recovering. You want all fresh materials.
Materials needed:
staple gun
scissors
fabric tape (duct tape would work fine)
Step one: Remove the chair pads from the frame of the chairs.
Step two: Cut fabric to the size of the pad, leaving ample working material to go over sides. You better off to have too much fabric rather than not enough.

Step three: Starting with the front of the chair fold over fabric. Make sure you line up the design so the cushion doesnt look crooked when it is completed. If this is your first time, I recommend a solid color or print that doesn't have any lines. Staple the front going from one end to the other, do not staple to the corner. Leave about an inch and half.


Step five: Staple the sides all the way to the backa nd leave the one and half inch space for the corners there as well. As you staple the sides, make sure you pull the fabric taut so it is does not have gaps and puckers.

Step six: Finally the back. turn the seat over to assess the look. If you see any gaps you can pull the fabric in the back to work it out. Make sure when you are completing the back that you are stretching the material so that the finished project is tightly on the chair pad.

Step seven: Trim any excess material off and if you want a more finished product tape down the edges of the material onto the chair pad. Place back on the chair frames and screw into place.
Subscribe to:
Posts (Atom)