Wednesday, March 30, 2011
Iron Craft Hooky
Okay so I did not make anything this week for Iron Craft. I have been spending my time on a very time consuming quilt. Itsy bitsy pieces, double quilting. What do I mean by double quilting. Well I am doing this scrappy quilt and since I was cutting every piece of fabric I had, I decided to do another scrappy quilt at the same time. Then I was thinking that some of my scraps could be made into another quilt. But I kind of put that one aside as it is a bit overwhelming. Two at a time works fine.
This outfit I made for my daughter at Christmas time. Both of my girls always want some kind of hippo for Christmas because of Shirley Temples song, I want a Hippopatamus for Christmas. It ended up being a bit too big. I love the bright colors and Spring like fun that is in this outfit- suits my youngest completely.
Monday, March 28, 2011
Without A Walking Foot
Without a walking foot, I am afraid my stitch in the ditch kind of went askew. See how it kind of pulls. I do like the stippling in the center. It was my first time doing it. A lot of fun and witht he stitch regulator, it made it a bit more simpler. I am not sure what to do with it. Any ideas?
Wednesday, March 23, 2011
Iron Craft: Lucky
Late... tired... but my posted Iron Crafter challenge is here. The theme of the month is Lucky. I am so lucky to have a brand new sewing machine. I have been trying out stitches on these little napkins. I used green for lucky. I like them all but I think I like the simple scallop for napkins. I am looking forward to playing with the stitches.
I have been working on my sewing, computer, girls room to do homework, creation room for a good chunk of the day. I should show you before and after pictures. The only thing is that I am not sure how or when the after will be. I have some room positioning issues to work out. I will keep you posted.
I have been working on my sewing, computer, girls room to do homework, creation room for a good chunk of the day. I should show you before and after pictures. The only thing is that I am not sure how or when the after will be. I have some room positioning issues to work out. I will keep you posted.
Saturday, March 19, 2011
Patricia's Quilt Show 2011; a sampling
Today I just had to go to a quilt show on the other side of town. The store, Patricia's puts on the quilt show at the Piano Works Mall. I have never been to it before but after taking a fewc lasses there and hearing about it, I had to check it out.
I picked up my daughter from her class and begged her, well bribed her. I told her if she did not whine and complain, I would be her a frosty from Wendy's. She complied and so did I.
This bear paw/bear claw was by a woman I met in my Cathedral Window class. I love the array of colors she chose and how they all went together so nicely.
I loved the flow of this and all the beautiful batiks.
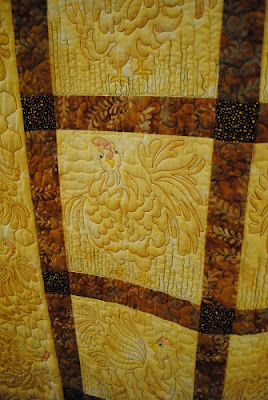
This one was very neat. The picture does not d oit justice but really none of the pictures do the quilts justice. This one wasn't so much the piecing that made you wow but rather the quilting. All the roosters in various angles quilted in the blocks. Check the following picture for more detail.
A very vibrant sampler. I am totally drawn to colors like these.
Love these stars and the Christmas motif. There are little snowmen int he blocks.
Love the blues in this pinwheel type quilt. A very relaxing color to cuddle under, don't yah think?
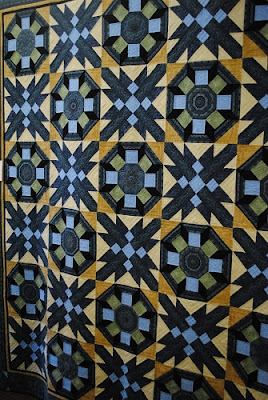
I love the mix of brown and blue in this. I like the pattern as well.
I love the design of a compass rose, always have. Its one block I would love to learn how to make.
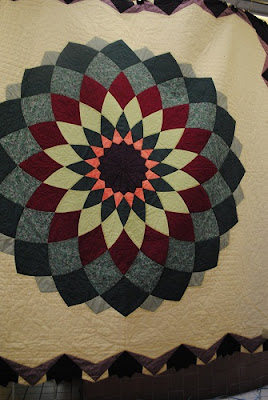
This is a Dahlia quilt, taught by an instructor, Suzzy Payne. I have already taken her sampler class. She also has a book written about how to make this quilt. She has a knack for simplifying quilts for you.
Loved the way this one was pieced. Very smart!
Here is a little closer look.
Here is a little close up of the bread.
I really think this one is beautiful.
There were many more quilts there. I just took some shots of a few that really caught me.
Wednesday, March 16, 2011
Iron Craft Challenge: The color green
Iron Craft challenge for this week was to do something green, the color green. I did a little green. It may look yellow but it is actually a pale green.
This is a Cathedral Window pattern that I learned this past Sunday. As you whip it up you are making the front and back at the same time. No need to buy batting and backing. The down side is that it uses up a ton of fabric. You can see an excellent tutorial from this guy at this site. Check it out.
There is also another way to do cathedral window quilts that I will show you when I make a bit more progress.
Saturday, March 12, 2011
Glacier Quilt
All done. It measures about 4 feet by 6 feet which is what I was aiming for. I wanted a nice little quilt- quickly made with the machine to cover myself up on the couch or cuddle with my girls on the couch. Of course they are always kicking covers off not putting them on.
In the late 90's I went to Alaska. I went with my brother and three of my cousins. All of whom were not related as they were from both sides of our parents. We rented a trailer to tool around in. It was a great idea. No need to set up hotels, other than our first night. We just needed to find campgrounds which was pretty easy. Of all the places we went I enjoyed Seward the most. We took a boat ride and looked at the glaciers and by chance saw a whale up close. It was a beautiful day, sunny and pleasant. We watched the cabbing. So awesome. So breath taking. I can't say enough nice words about Alaska. I am quite sure that if I did not meet my husband I would have ended up living there for a while.
I have many fond memories of Alaska- bears, bald eagles (bald headed as my oldest daughter calls them- fondly after her Grandpa), glaciers, mountains, the top of Denali, lupines, the sea, seals, puffins, and just pristine beauty everywhere.
Wednesday, March 9, 2011
Iron Craft: Fat Quarter for Fat Tuesday- Pyramid Coin Purse
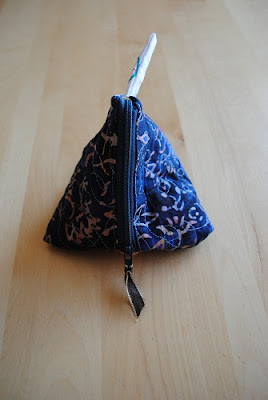
The challenge for this months Iron Craft was to use a fat quarter for something. Perfect. I needed and excuse to make this cute little bag.
This little coin purse, measuring about 5 inches across is so perfect for some money, keys and lipstick. Or whatever you want. I saw it on Sew Me Something Good and knew I had to make it. I followed her directions, which were written so well. Go step by step and dont be overwhelmed. It is quite simple after the first run through. You will be making tons of them, they are rather addicting.
I did change it a bit. I made a tiny quilt sandwich with muslin and then used a piece of kona for the lining. Its sturdier than the first one I made with just two piece of fabric plus lining.
Wednesday, March 2, 2011
Pin Cushion Carry All
I made this pin cushion caddy that I have been just dying to make for a while. I just finished my quilt and I finished piecing the top of another quilt. I wanted a project that I could whip in a day or so. I feel the need for a sense of completion sometimes. Quilts are process oriented. I thought this was the perfect time to do that pin cushion caddy. Thanks for the excuse, Iron Crafters as it was perfectly aligned with one of my favorite movies.
I had borrowed Seams To Me by Ann Marie Horner. I thought I wrote down the instructions for the caddy but I did not. I happened to find them online here though. I also saw this at Texas Freckles which is what actually re-inspired me to make it. I followed none of anyone's directions. (I am like that- I hate following directions, the written kind). Matter of fact I made my own pattern piece. Was it a good idea? Well, yes and no. It came out well but not like I wanted it to. I want to make it again using Horner's pattern etc, along with Texas Freckles adaptations. We'll see if I actually do that.
My theme was Somewhere Over The Rainbow from the movie Wizard of Oz which is one of my all time favorite movies. I guess it was nominated in 1940 but never actually won.
A bit of warning if you end up making this caddy: It's a lot of hand sewing which personally I don't mind sometimes. The only part you sew on a machine are the side pieces.
Here is what I did:
I cut out my pieces, I had to readjust one time because they came out sort of like a nose.
I sewed them together to make the full circle. I folded the top down a quarter inch and pressed it.
I used some stiff interfacing I had and made a sandwich with my lining for the caddy and some muslin. I then sewed the top of my pretty circle to the muslin,lining and interfacng sandwich.
I stuffed from the bottom and sewed it shut at the base. I then put two circles in, one at the bottom inside and then one at the bottom outside, using that stiff interfacing. Done. After many pin pokes, done.
I set a can of Mamacita's Hominy in the basket to straighten out the form a bit. That helped immensely. (It must have been 'cause it was Mamacita- women have a way of fixing things).
Subscribe to:
Posts (Atom)


